Default fonts and styles for Outlook via Intune

I might be not the only one who thought it would be simple to configure default fonts and styles for Outlook, via Intune. There’s no default policy available who can configure this directly from Intune. I had to create a PowerShell script for this.
Note: Are you looking for a way to manage default fonts for the New Outlook client? Take a look here: Manage fonts in Outlook (new) via PowerShell – Joey Verlinden
Note: When I wrote this blog, Proactive remediation did not exist yet. In the comments, Olivier published his remediation script. If you have the required licenses for Proactive Remediation I recommend to take a look at his comment here. Also, Raphaël Zimmermann wrote a new article about Outlook fonts via Proactive Remediation.
Users can change this setting on their device to anything they want. The company policy states that Outlook should use a specific font and styling. I had to figure out how to configure this setting every time over and over again.
I found the Intune Login script method by Nicola Suter (Nicolonsky Tech). This script creates a scheduled task in the endpoint which runs at every logon (in user context). It stores the actual PowerShell script in the endpoint in C:\ProgramData\…\. Yes, a very smart user could still modify this file, but Intune will overwrite it again so this one should be fine!.
Update 20-10-2022
Thanks to Raphaël Zimmermann, we now have a proactive remediation which configures the fonts in the endpoint. This is a way better approach then the logon script I wrote about before. I’ll steel some of his work and share it here with you :).
Steps to take:
- Create template in Outlook
- Export Data
- Create Detection Script
- Create Remediation Script
- Deploy with Intune
1. Create template in Outlook
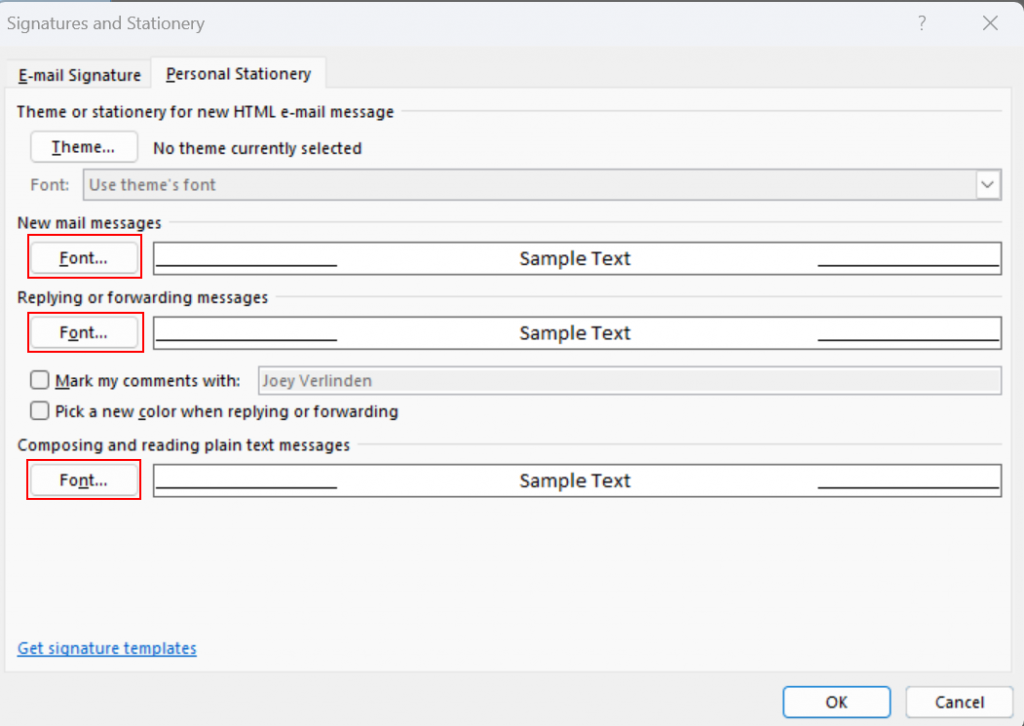
Configure your required fonts. This one will be used as our template. These settings can be found via File – Options – Mail – Stationery and Fonts.
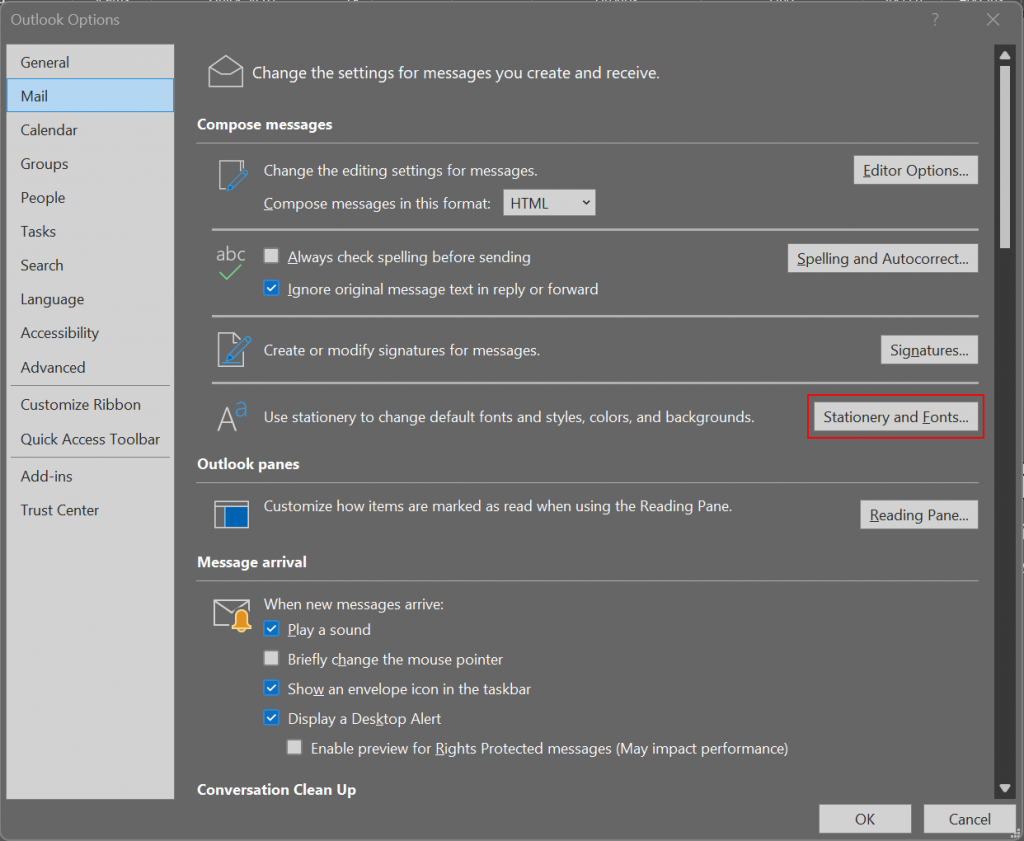
Configure the required font/settings as you company requires them. It’s recommended to only use built-in (default) fonts. Custom fonts are not available on devices and thus the proactive remediation will fail.
2. Export Data
Once you have set your fonts as desired, you can find your settings in the “Registry Editor”. Just search for it on your PC and navigate to the following path:
Computer\HKEY_CURRENT_USER\SOFTWARE\Microsoft\Office\16.0\Common\MailSettings
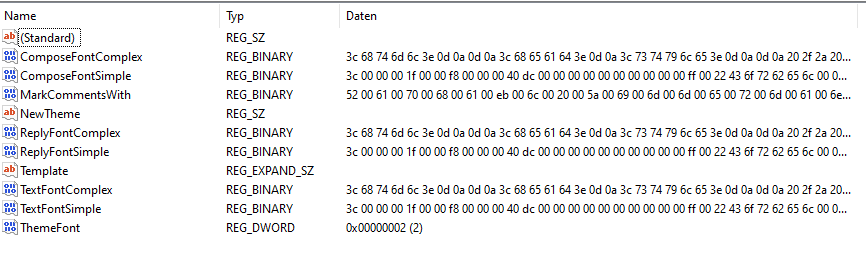
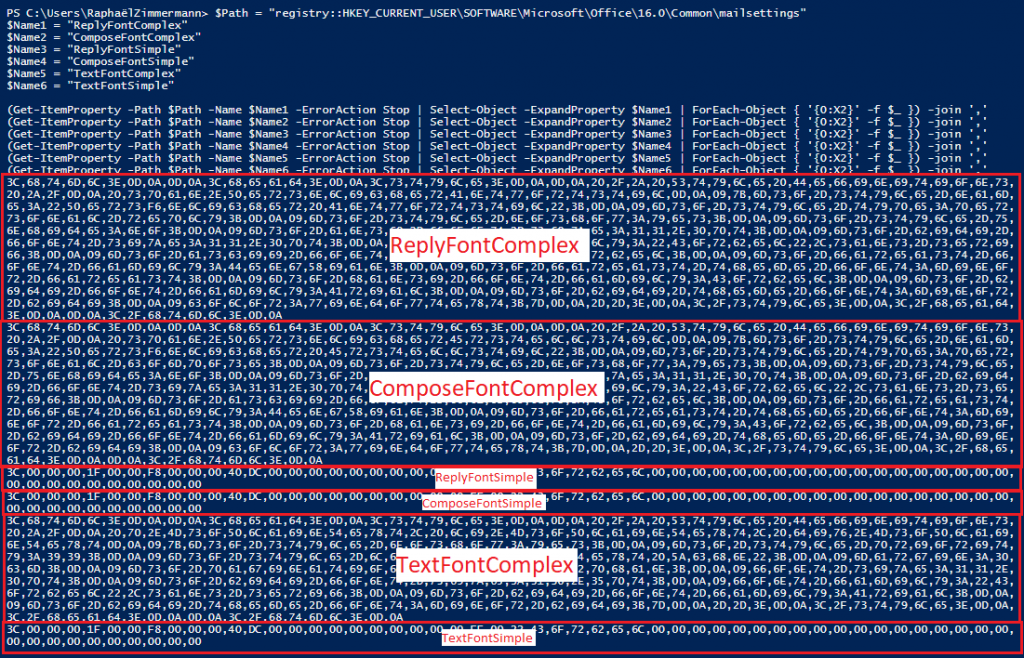
The configuration is stored in binary. These must be exported. You can export them under “File”, but that is not well formatted with backslashes in between and things like that. Raphael created a script to extract them in the right format:
$Path = “registry::HKEY_CURRENT_USER\SOFTWARE\Microsoft\Office\16.0\Common\mailsettings” $Name1 = “ReplyFontComplex” $Name2 = “ComposeFontComplex” $Name3 = “ReplyFontSimple” $Name4 = “ComposeFontSimple” $Name5 = “TextFontComplex” $Name6 = “TextFontSimple”
(Get-ItemProperty -Path $Path -Name $Name1 -ErrorAction Stop | Select-Object -ExpandProperty $Name1 | ForEach-Object { ‘{0:X2}’ -f $_ }) -join ’,’ (Get-ItemProperty -Path $Path -Name $Name2 -ErrorAction Stop | Select-Object -ExpandProperty $Name2 | ForEach-Object { ‘{0:X2}’ -f $_ }) -join ’,’ (Get-ItemProperty -Path $Path -Name $Name3 -ErrorAction Stop | Select-Object -ExpandProperty $Name3 | ForEach-Object { ‘{0:X2}’ -f $_ }) -join ’,’ (Get-ItemProperty -Path $Path -Name $Name4 -ErrorAction Stop | Select-Object -ExpandProperty $Name4 | ForEach-Object { ‘{0:X2}’ -f $_ }) -join ’,’ (Get-ItemProperty -Path $Path -Name $Name5 -ErrorAction Stop | Select-Object -ExpandProperty $Name5 | ForEach-Object { ‘{0:X2}’ -f $_ }) -join ’,’ (Get-ItemProperty -Path $Path -Name $Name6 -ErrorAction Stop | Select-Object -ExpandProperty $Name6 | ForEach-Object { ‘{0:X2}’ -f $_ }) -join ’,’
3. Create Detection Script
Now we can create the “Detect” script. For the recognition I used only the complex strings, because they contain all the details like sizes and so on. The simple values only contain the font itself, so the complex value contains all the details from the simple value anyway.
All you have to do is copy the binary string for “ReplyFontComplex” into the field for $Value1 and the binary string for “ComposeFontComplex” into $Value2 in the following script:
$Path = “registry::HKEY_CURRENT_USER\SOFTWARE\Microsoft\Office\16.0\Common\mailsettings” $Name1 = “ReplyFontComplex” $Name2 = “ComposeFontComplex” $Value1 = “3c,68,74,…” $Value2 = “3c,68,74,…”
Try { $Registry1 = (Get-ItemProperty -Path $Path -Name $Name1 -ErrorAction Stop | Select-Object -ExpandProperty $Name1 | ForEach-Object { ‘{0:X2}’ -f $_ }) -join ’,’ $Registry2 = (Get-ItemProperty -Path $Path -Name $Name2 -ErrorAction Stop | Select-Object -ExpandProperty $Name2 | ForEach-Object { ‘{0:X2}’ -f $_ }) -join ’,’ $Registry3 = Get-ItemProperty -Path $Path -Name ThemeFont -ErrorAction Stop | Select-Object -ExpandProperty ThemeFont If ($Registry1 -eq $Value1 -and $Registry2 -eq $Value2 -and $Registry3 -eq 2){ Write-Output “Compliant” Exit 0 } else { Write-Warning “Not Compliant” Exit 1 } } Catch { Write-Warning “Not Compliant” Exit 1 }
Save the script with a common name e.g., “DetectOutlookFont.ps1”.
4. Create Remediation Script
Next, we need to define what happens when the detection script ends with “Exit 1”.
Again, just paste your strings into the correct fields in the script. You only need to insert the simple values once, as this is always the same for reply, compose and text. Not so the complex values, they differ slightly from each other even if they have the same font and size, so here you have to insert all the values in the right places.
$ValueSimple = “3c,00,00,…” $ValueComposeComplex = “3c,68,74,…” $ValueReplyComplex = “3c,68,74,…” $ValueTextComplex = “3c,68,74,…”
$registryPath = ‘HKCU:\SOFTWARE\Microsoft\Office\16.0\Common\mailsettings’ $Name1Simple = “ComposeFontSimple” $Name1Complex = “ComposeFontComplex” $Name2Simple = “ReplyFontSimple” $Name2Complex = “ReplyFontComplex” $Name3Simple = “TextFontSimple” $Name3Complex = “TextFontComplex”
$hexSimple = $ValueSimple.Split(’,’) | % { “0x$_”} $hexComposeComplex = $ValueComposeComplex.Split(’,’) | % { “0x$_”} $hexReplyComplex = $ValueReplyComplex.Split(’,’) | % { “0x$_”} $hexTextComplex = $ValueTextComplex.Split(’,’) | % { “0x$_”}
IF(!(Test-Path $registryPath)) { New-Item -Path $registryPath -Force | Out-Null New-ItemProperty -Path $registryPath -name NewTheme -PropertyType string New-ItemProperty -Path $registryPath -Name $Name1Simple -Value ([byte[]]$hexSimple) -PropertyType Binary -Force New-ItemProperty -Path $registryPath -Name $Name2Simple -Value ([byte[]]$hexSimple) -PropertyType Binary -Force New-ItemProperty -Path $registryPath -Name $Name3Simple -Value ([byte[]]$hexSimple) -PropertyType Binary -Force New-ItemProperty -Path $registryPath -Name $Name1Complex -Value ([byte[]]$hexComposeComplex) -PropertyType Binary -Force New-ItemProperty -Path $registryPath -Name $Name2Complex -Value ([byte[]]$hexReplyComplex) -PropertyType Binary -Force New-ItemProperty -Path $registryPath -Name $Name3Complex -Value ([byte[]]$hexTextComplex) -PropertyType Binary -Force }
ELSE { Set-ItemProperty -Path $registryPath -name NewTheme -value $null Set-ItemProperty -Path $registryPath -name ThemeFont -value 2 Set-ItemProperty -Path $registryPath -Name $Name1Simple -Value ([byte[]]$hexSimple) -Force Set-ItemProperty -Path $registryPath -Name $Name2Simple -Value ([byte[]]$hexSimple) -Force Set-ItemProperty -Path $registryPath -Name $Name3Simple -Value ([byte[]]$hexSimple) -Force Set-ItemProperty -Path $registryPath -Name $Name1Complex -Value ([byte[]]$hexComposeComplex) -Force Set-ItemProperty -Path $registryPath -Name $Name2Complex -Value ([byte[]]$hexReplyComplex) -Force Set-ItemProperty -Path $registryPath -Name $Name3Complex -Value ([byte[]]$hexTextComplex) -Force }
Save the script with a common name e.g., “RemediateOutlookFont.ps1”.
5. Deploy with Intune
Now we are ready for deployment. Navigate to “Proactive Remediations” in the Endpoint Manager portal. You can use the search bar to find the files created previously.
Upload your scripts and set the settings as desired:
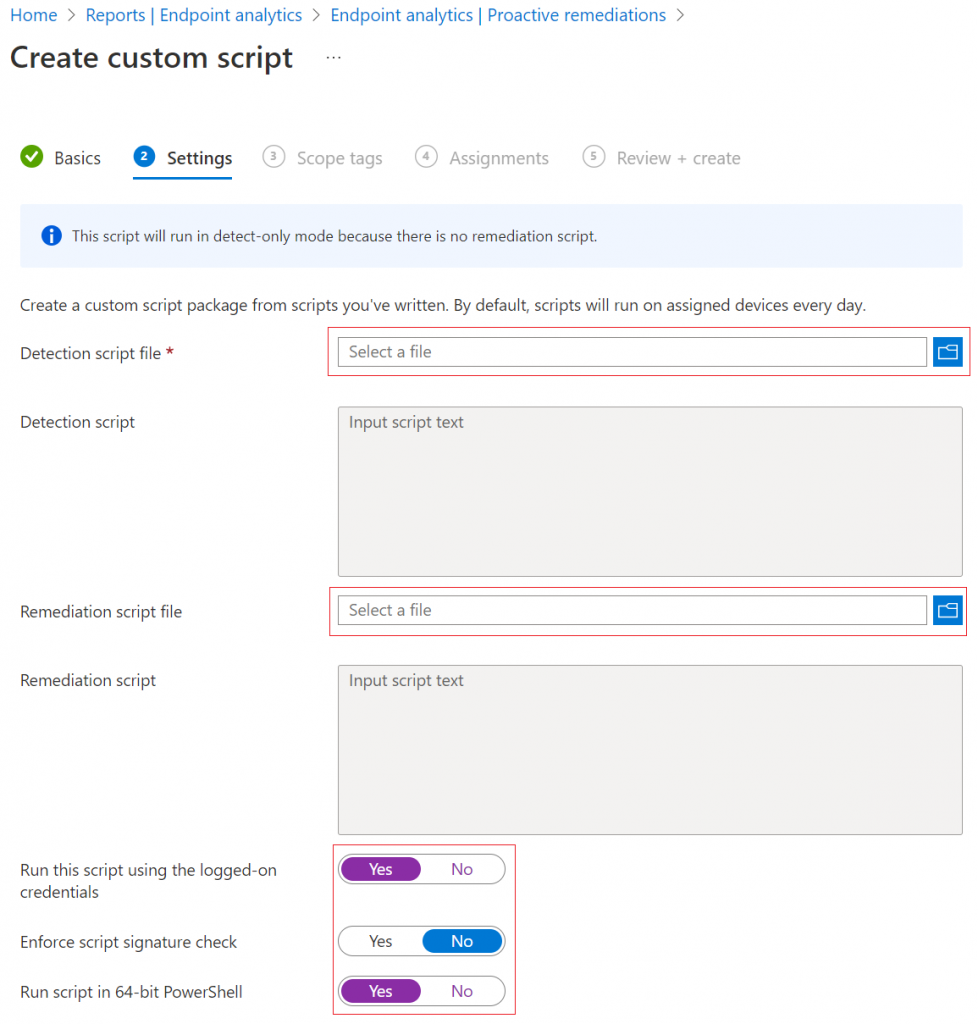
Assign the script to your desired Azure AD group. Wait for the proactive remediation to apply and verify the settings in the endpoints and or in the proactive remediation blades.
I want to thank Raphael for converting my previous script to a proactive remediation script. This is a way better approach for your devices. Make sure you are allowed to use proactive remediation scripts. License requirements can be found here.
Written by Joey Verlinden
Back to all articles